
Charging Systems
Dynamo Maintenance
By John Joyce
Batteries and charging systems are things that are taken for granted, until one morning your engines won't turn over because the batteries are flat. A little preventative maintenance pays reliability dividends in the long term.
Here I present my suggestions as to maintenance and basic fault finding, based on several years' experience with DMUs and Mk 1 coaches - however as always I am open to corrections, suggestions and additions. This isn't intended to be an exhaustive or definitive guide; if in doubt, consult a specialist. I am happy to try to help with problems!
Introduction
Generators are generally much less useful than alternators on preserved lines trundling along at 20-25mph, although they are substantially better than nothing! A little maintenance keeps them in good working order.
Tools
A digital voltmeter is cheap, robust and reliable; analogue ones tend to take exception to being thrown around in toolboxes! Beware of using 'megger' type resistance meters; semiconductors are easily damaged by the high voltages generated by these. Beyond that, the contents of an average toolbox is all that is required: screwdrivers and spanners.
Generators
Generator-fitted DMU vehicles employ a machine nominally rated at 150amps. Regular maintenance is mostly confined to the brushgear; every few months the brushes should be checked to make sure that they move freely in their holders so that the springs hold them firmly against the commutator. They do wear out eventually but this should take a long time on a preserved line! Trailer cars have a mechanism allowing the complete brushgear assembly to rotate by 90 degrees when the vehicle reverses direction. Make sure that this can move easily, as it relies on the friction between brushes and commutator to rotate it. This arrangement also requires two straps to connect the brushgear to the generator itself, and these eventually break.
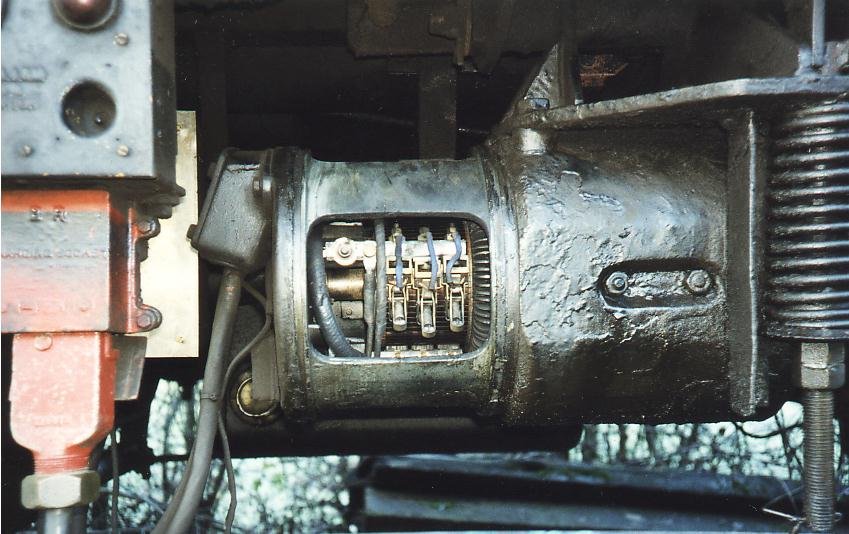
General view of dynamo on power car. Fire panel and charging socket to left. Connection box behind with newly-manufactured cover after problems with corroding terminals!
The commutator segments should be checked for burning, which can cause brushes to be 'eaten' at a ferocious rate, usually accompanied by everything being covered in black carbon dust. In this case it will be necessary to skim the commutator, a job best left to a specialist, although with some ingenuity it can be undertaken in situ.
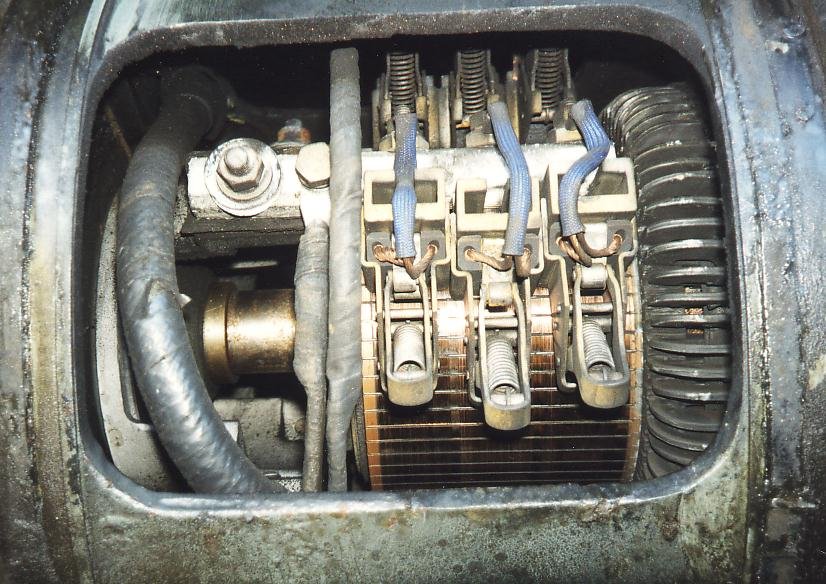
Close-up of power car dynamo. Rather oilier than the other one due to our 104's habit of covering everything nearby in oil!! Again brushgear (fixed, I think - although I never thought to check) visible.
Problems rarely arise apart from oil contamination of the brushgear, the source of which must be dealt with, otherwise endless problems with sticking brushes will be encountered. It is worth taking some time to clean the brushgear and commutator properly in this case. There are two or more fuses located nearby in the generator connection box which rarely give trouble, although problems have been found with corrosion where a lid was missing for some years. Old ring-pulls, aluminium foil and bits of wire can be found as substitute 'fuses' which are best replaced by the correct item!
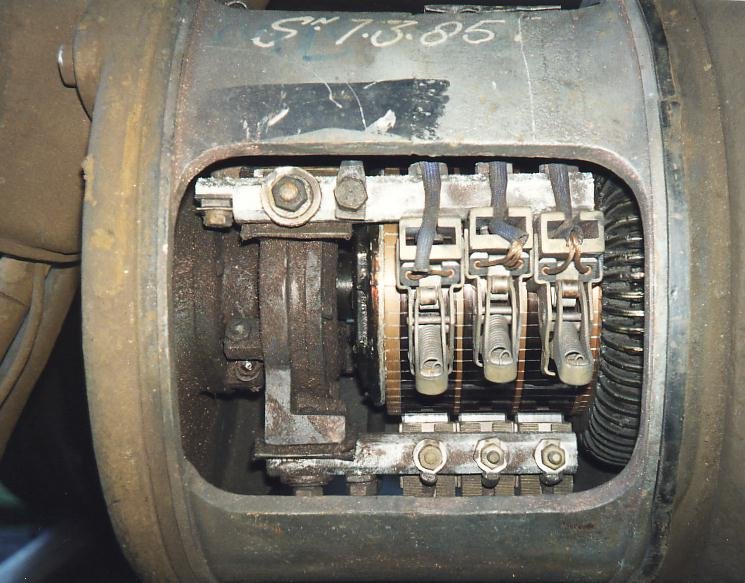
Close-up view of trailer car dynamo. Reversing brush gear in mid position to show the brushes, brush springs and pigtails. (the little blue wires going to the brushes) Not really visible unfortunately are the copper braids that collect the current when it reverses - you can just see the end of one on the top left left bolt, disappearing out of sight. The other big wire of which the end is visible under a bolt (approximately under the '7') connects to the brushes directly opposite: there are four sets of brushes in total, two positive and two negative. Probably the most useful shot.
Generator Control Panels
These are a pretty complicated piece of kit, and I would suggest leaving well alone unless you really know what you are doing. (I don't!) The principle is simple enough, in that a constant current is supplied when the generator first cuts in, until a certain voltage is attained; thereafter, a constant voltage is supplied. Turning the car lights on increases the current supplied. A number of adjustments are possible, but without a suitable bench test set this is virtually impossible to achieve accurately.
Two small rewireable snap-in fuses are located in the control panel, and are worth checking in the event of the generator failing. The connections to the panel should be checked for security. It may also be useful to note that the guard's food warmer (if fitted) is connected to the generator output; hence the food warmer (assuming that it works) can be used as a simple test to see when the generator cuts in!
Generators - Testing and Fault Finding
On trailer cars, attach a digital voltmeter to a suitable point (e.g. the inspection light socket in the cab) and watch the voltage as the vehicle accelerates. At around 15mph the voltage should start to rise from 24-25 volts to 27-31 volts. If no change is seen by 25mph then the generator is defective. Assuming that the items mentioned above have been checked (brushgear, fuses and connections), the fault finding procedure for power cars is relevant in parts, but otherwise the generator or control panel will need attention from somebody versed in the art.
On power cars, isolate the relevant final drive and start the engine, and have an assistant(!) engage fourth gear. The generator will probably start turning in neutral anyway due to drag through the gearbox, but it will not produce much output. Monitor the battery voltage with a digital voltmeter, either at the battery charge socket or the inspection light socket on the local engine control panel, depending on which is most convenient. This should read 24-25 volts with the engine idling; increasing the engine speed should produce a distinct increase in voltage to 27-31 volts, indicating that the generator is producing some output.
If the above test shows no increase in voltage with the generator turning at a fair speed, stop the engine and check the brushgear, control panel fuses and connection box fuses. Make sure that the latter in particular are good and clean to achieve good connections - if not, rub on fine wet-and-dry paper on a flat surface before refitting. Check all terminals are tight in the generator, connection box and control panel - things tend to work loose and corrode over the years.
Still no output? Remove the 'field' fuse in the connection box, and connect a 6 volt battery between the 'field' terminal on the generator side of the fuse and the negative connection. You can use the car's own batteries by running a lead from the middle of the relevant battery bank, but make sure you have 6 volts not 18! Now restart the engine and measure the voltage at the generator's output terminals G+ and NEG - this should be a few volts, and increase with engine speed to 20 volts or more. If so, the control panel is not working; otherwise the generator requires further attention. If in doubt then substitution of the suspect component with a known working one should verify the diagnosis.
Summary
The paragraphs above may make the subject sound vastly complicated, but it isn't really. Simple regular maintenance (checking brushgear and charging voltage) ensures good reliability; most faults are cured fairly easily by checking these items, along with fuses and connections. Only in rare cases is specialist help necessary.